Any member can invite other members:
Admins can create (not only invite) and edit members:

- Go to the Members module
- Click on the ellipsis on the upper right
- Choose Add member...
- This ensures the member you create is already activated and does not need to respond to an invite to gain access
- The Add member dialogue box opens
- Fill out these fields
- Admins can also edit these members' information after they are created
- Admins can click this ellipsis to
- Reset passwords to a random password (if you are on SSO, this option will not appear as you don't use passwords)
- Change to a specific password of your choosing
- Deactivate the member's access
- Resend confirmation email to member if they have only been invited and are not yet activated (does not apply to SSO)
Video: Inviting and Managing Your Members
Inviting Members in Avantis
-
Open the Members Area – Navigate to the Members section in Avantis.
-
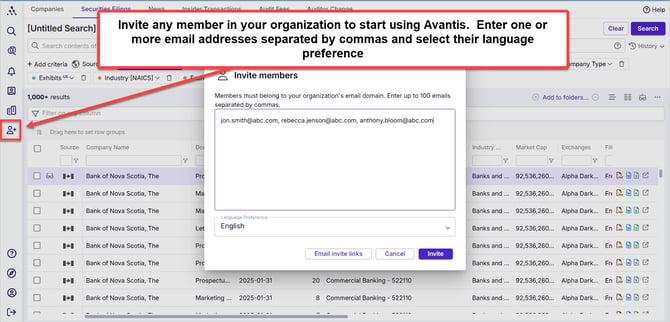
Click "Invite Members" – Locate the button in the upper right corner.
-
Enter Email Addresses – Add up to 100 email addresses, separated by commas.
-
Send Invitations – Click Invite to send requests.
-
Confirm Email – Each member will receive a confirmation email to verify their address.
Resending or Cancelling an Invitation
-
Check Member Status – If a member hasn’t confirmed their email, their status will show as Unverified.
-
Decide on Next Steps – You can either resend the confirmation email or cancel the invitation.
-
Resend or Cancel – Click the ellipsis (...) on the far right of their row and select Resend Confirmation or cancel as needed.
Resetting or Changing a Member’s Password
-
Determine the Need for a Reset – If a member has confirmed their email and set a password but has forgotten it, you can either:
- Reset the password to a randomly generated one, or
- Change the password to one you create.
- Select the Option – Click the ellipsis (...) on the far right of their row and choose Reset Password or Change Password as needed.
To Deactivate a Member
- Method 1:
- Click on the edit icon (pencil) at the far-right of the row containing their name.
- In the dialogue box that appears, toggle the Activated switch to deactivate them.
- Method 2:
- Click on the ellipsis (...) at the far-right of their row.
- Select Deactivate.
- Filter Activated Accounts (optional):
- You can filter to show only activated accounts by typing or selecting "activated" in the Status column of your user list.
- You can filter to show only activated accounts by typing or selecting "activated" in the Status column of your user list.
To Reactivate a Member
-
Click on the edit icon (pencil) at the far-right of the row containing their name.
-
In the dialogue box that appears, toggle the Activated switch to reactivate them.
To Edit a Member’s Information (including upgrading to Admin)
- Click on the edit icon (pencil) at the far-right of the row containing their name.
- In the dialogue box, change any desired information and click Save.
- To Upgrade a Member to Admin:
- Use the Role field to upgrade the member.
- Member: A member can search, share their own searches, and invite other members. They cannot edit or share searches they have not themselves created.
- Search Admin: A Search Admin has all of the privileges of a member, plus they can also view and edit any of the organization's saved searches.
- Admin: An Admin has all of the privileges as a Search Admin, plus the ability to deactivate and reactivate members.
- Use the Role field to upgrade the member.
To Export Usage Reports

-
Navigate to the Members module in the left hand margin
-
Click on the Select Columns and Order icon (the icon that looks like two side-by-side columns) on the upper right and select the usage related columns you'd like included in your report and order them how you'd like:
- Last Use
- Searches
- Views
- Alerts Enabled
- Alert Notifications
- Alert Emails
- Last Alert Email
- Etc.
-
You will see usage statistics that reflect all time usage. To narrow to a particular time range, click on Filter usage statistics by date right under the Members heading on the upper left
- Select the members you'd like to include in your usage report - you may use the "Select All" box to select all members. Ensure that the number of selected rows match the rows you want to include
- Click on the ellipsis (...) on the upper right
- Choose Export
- Select Excel as an output format